kubeadm安装K8S(集群)
前言
市面上很多k8s的安装工具,作为产品的设计者和推广者,K8S组织也知道自己的产品部署起来十分的困难,于是把开源爱好者写的工具kubeadmn收编为正规军,纳入到了自己的麾下。
为什么我们要用kubeadmn来部署?因为kubeadm不仅直接相关的命令简单到只有两条,而且还可以放生产环境使用(这里有个前提,需要能很好的理解K8S的各个组件,处理好它们的关系,说人话就是能干看得懂、玩得转)。
官方文档有中文教程,K8S最新版本1.26已经弃用了docker做自己的运行时,笔者还没有摸索出来怎么部署,这里就以老版本的1.18为例子来讲解
我的演示环境
系统:centos7.6
CPU:2核
内存:2G
最好是2核4G,20G硬盘,如果你想模拟更多的生产环境过程部署,比如jenkins、nginx、MySQL等,最好提升一下虚拟机配置,否则可能无法运行那么多的pod。
因为是演示环境,所以这里操作的是单节点。集群节点我会写备注
环境配置
[集群的node节点,这一步也需要执行]
# yum源改为阿里云
curl -o /etc/yum.repos.d/CentOS-Base.repo https://mirrors.aliyun.com/repo/Centos-7.repo# vim配置
echo -e 'set paste
set expandtab
set ts=4' >> ~/.vimrc# 一些工具
yum install net-tools vim telnet lsof -y# k8s用阿里云源,这样速度快一些
echo '#k8s
[kubernetes]
name=Kubernetes
baseurl=https://mirrors.aliyun.com/kubernetes/yum/repos/kubernetes-el7-x86_64
enabled=1
gpgcheck=0
'>/etc/yum.repos.d/kubernetes.repo#
setenforce 0
sed -i 's/SELINUX=enforc.*/SELINUX=disabled/g' /etc/selinux/config
cat <  /etc/sysctl.d/k8s.conf
net.bridge.bridge-nf-call-ip6tables = 1
net.bridge.bridge-nf-call-iptables = 1
EOF
sysctl --system# 关闭swap
swapoff -a
sed -ri 's/.*swap.*/#&/' /etc/fstab
free -m |grep Swap
# 关闭防火墙
systemctl stop firewalld && systemctl disable firewalld
部署 docker [集群的node节点,这一步也需要执行]
yum install -y yum-utils device-mapper-persistent-data lvm2
yum-config-manager --add-repo https://mirrors.aliyun.com/docker-ce/linux/centos/docker-ce.repo
yum install -y docker-ce docker-ce-cli containerd.io
mkdir /etc/docker
cat > /etc/docker/daemon.json <
部署kubeadm
[集群的node节点,这一步也需要执行]
yum install -y kubelet-1.18.2 kubeadm-1.18.2 kubectl-1.18.2
systemctl enable kubelet && systemctl start kubelet#查看需要依赖的镜像版本
kubeadm config images list
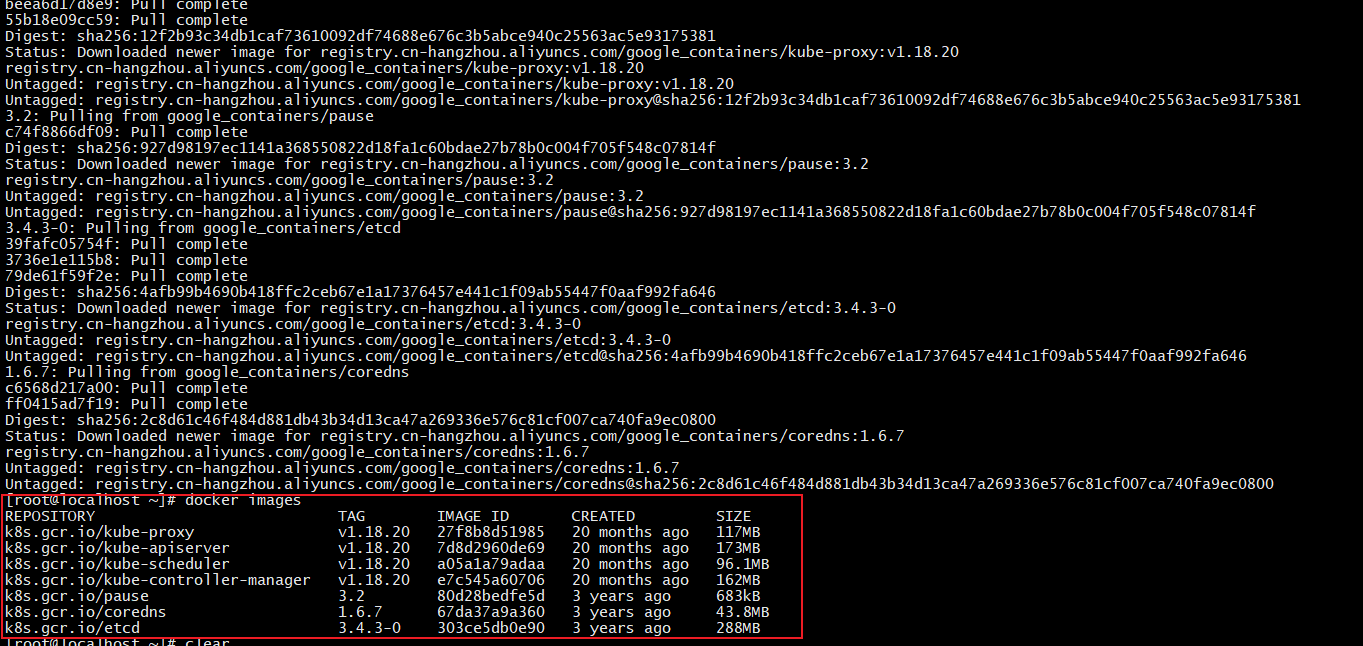
kubeadm 部署的时候默认从k8s.gcr.io拉取镜像,对于国内用户来说要么速度慢,要么无法下载,换成阿里云的镜像,如何换?笔者猜kubeadm理论上是调用了"docker pull"命令,那么就跟自己手动没什么区别。
# 通过这个命令可以获取到需要拉取的镜像名称
kubeadm config images list | awk -F'/' '/k8s.gcr.io/{print $2}'
cat > ~/pull_image.sh <看下已经拉取下来的镜像,k8s.gcr.io开头的都是刚刚拉取的镜像文件

kubeadm初始化 master
# kubeadm config print init-defaults > /opt/kubeadm-config.yaml
kubeadm init --pod-network-cidr=10.244.0.0/16 --kubernetes-version=v1.18.2 2>&1 | tee kubeadm-init.log
这执行真一步的时候我遇到了报错,
[init] Using Kubernetes version: v1.18.2
[preflight] Running pre-flight checks[WARNING Firewalld]: firewalld is active, please ensure ports [6443 10250] are open or your cluster may not function correctly[WARNING SystemVerification]: this Docker version is not on the list of validated versions: 23.0.1. Latest validated version: 19.03
[preflight] Pulling images required for setting up a Kubernetes cluster
[preflight] This might take a minute or two, depending on the speed of your internet connection
[preflight] You can also perform this action in beforehand using 'kubeadm config images pull'
error execution phase preflight: [preflight] Some fatal errors occurred:[ERROR ImagePull]: failed to pull image k8s.gcr.io/kube-apiserver:v1.18.2: output: Error response from daemon: Get "https://k8s.gcr.io/v2/": dial tcp 142.250.157.82:443: i/o timeout
, error: exit status 1[ERROR ImagePull]: failed to pull image k8s.gcr.io/kube-controller-manager:v1.18.2: output: Error response from daemon: Get "https://k8s.gcr.io/v2/": net/http: request canceled while waiting for connection (Client.Timeout exceeded while awaiting headers)
, error: exit status 1[ERROR ImagePull]: failed to pull image k8s.gcr.io/kube-scheduler:v1.18.2: output: Error response from daemon: Get "https://k8s.gcr.io/v2/": net/http: request canceled while waiting for connection (Client.Timeout exceeded while awaiting headers)
, error: exit status 1[ERROR ImagePull]: failed to pull image k8s.gcr.io/kube-proxy:v1.18.2: output: Error response from daemon: Get "https://k8s.gcr.io/v2/": dial tcp 142.250.157.82:443: i/o timeout
, error: exit status 1
[preflight] If you know what you are doing, you can make a check non-fatal with `--ignore-preflight-errors=...`
To see the stack trace of this error execute with --v=5 or higher
我猜,如果你到这里也是报错了,请看上面截图的输出,kube.*组件版本号是不是也是v1.18.20?如果是的话,我感觉这里可能是正则匹配的问题, kubeadm出错了,没关系,手动tag一下把镜像改为1.18.2即可,就可以走通了。
接着往下:
mkdir -p $HOME/.kube
sudo cp -i /etc/kubernetes/admin.conf $HOME/.kube/config
sudo chown $(id -u):$(id -g) $HOME/.kube/config
kubectl get pod -A # 即可看到pod启动了
查看组件状态
kubectl get componentstatuses部署网络组件
为什么有pod状态是pending?这个是因为网络组件没有安装。
wget https://raw.githubusercontent.com/coreos/flannel/master/Documentation/kube-flannel.yml
# 下载之后本地执行命令, 虚拟机无法下载的话,翻墙浏览器打开URL
kubectl apply -f kube-flannel.yml
不能下载的话,可以复制下面的内容
---
kind: Namespace
apiVersion: v1
metadata:name: kube-flannellabels:pod-security.kubernetes.io/enforce: privileged
---
kind: ClusterRole
apiVersion: rbac.authorization.k8s.io/v1
metadata:name: flannel
rules:
- apiGroups:- ""resources:- podsverbs:- get
- apiGroups:- ""resources:- nodesverbs:- get- list- watch
- apiGroups:- ""resources:- nodes/statusverbs:- patch
- apiGroups:- "networking.k8s.io"resources:- clustercidrsverbs:- list- watch
---
kind: ClusterRoleBinding
apiVersion: rbac.authorization.k8s.io/v1
metadata:name: flannel
roleRef:apiGroup: rbac.authorization.k8s.iokind: ClusterRolename: flannel
subjects:
- kind: ServiceAccountname: flannelnamespace: kube-flannel
---
apiVersion: v1
kind: ServiceAccount
metadata:name: flannelnamespace: kube-flannel
---
kind: ConfigMap
apiVersion: v1
metadata:name: kube-flannel-cfgnamespace: kube-flannellabels:tier: nodeapp: flannel
data:cni-conf.json: |{"name": "cbr0","cniVersion": "0.3.1","plugins": [{"type": "flannel","delegate": {"hairpinMode": true,"isDefaultGateway": true}},{"type": "portmap","capabilities": {"portMappings": true}}]}net-conf.json: |{"Network": "10.244.0.0/16","Backend": {"Type": "vxlan"}}
---
apiVersion: apps/v1
kind: DaemonSet
metadata:name: kube-flannel-dsnamespace: kube-flannellabels:tier: nodeapp: flannel
spec:selector:matchLabels:app: flanneltemplate:metadata:labels:tier: nodeapp: flannelspec:affinity:nodeAffinity:requiredDuringSchedulingIgnoredDuringExecution:nodeSelectorTerms:- matchExpressions:- key: kubernetes.io/osoperator: Invalues:- linuxhostNetwork: truepriorityClassName: system-node-criticaltolerations:- operator: Existseffect: NoScheduleserviceAccountName: flannelinitContainers:- name: install-cni-pluginimage: docker.io/flannel/flannel-cni-plugin:v1.1.2#image: docker.io/rancher/mirrored-flannelcni-flannel-cni-plugin:v1.1.2command:- cpargs:- -f- /flannel- /opt/cni/bin/flannelvolumeMounts:- name: cni-pluginmountPath: /opt/cni/bin- name: install-cniimage: docker.io/flannel/flannel:v0.21.2#image: docker.io/rancher/mirrored-flannelcni-flannel:v0.21.2command:- cpargs:- -f- /etc/kube-flannel/cni-conf.json- /etc/cni/net.d/10-flannel.conflistvolumeMounts:- name: cnimountPath: /etc/cni/net.d- name: flannel-cfgmountPath: /etc/kube-flannel/containers:- name: kube-flannelimage: docker.io/flannel/flannel:v0.21.2#image: docker.io/rancher/mirrored-flannelcni-flannel:v0.21.2command:- /opt/bin/flanneldargs:- --ip-masq- --kube-subnet-mgrresources:requests:cpu: "100m"memory: "50Mi"securityContext:privileged: falsecapabilities:add: ["NET_ADMIN", "NET_RAW"]env:- name: POD_NAMEvalueFrom:fieldRef:fieldPath: metadata.name- name: POD_NAMESPACEvalueFrom:fieldRef:fieldPath: metadata.namespace- name: EVENT_QUEUE_DEPTHvalue: "5000"volumeMounts:- name: runmountPath: /run/flannel- name: flannel-cfgmountPath: /etc/kube-flannel/- name: xtables-lockmountPath: /run/xtables.lockvolumes:- name: runhostPath:path: /run/flannel- name: cni-pluginhostPath:path: /opt/cni/bin- name: cnihostPath:path: /etc/cni/net.d- name: flannel-cfgconfigMap:name: kube-flannel-cfg- name: xtables-lockhostPath:path: /run/xtables.locktype: FileOrCreate
这个时候各节点就正常了
加入node节点
这一部分网络上很多,暂时没什么可说的,部署记录到这里就结束了。
QA
pod coredns 状态异常
答:检查一下firewalld状态 "systemctl status firewalld.service",看看是不是之前的步骤中,忘记了执行关闭防火墙这一步。
node节点显示NotReady,并且describe之后显示:Node node06 status is now: NodeHasSufficientPID
答:检查一下是不是之前,在node节点要执行的步骤,没有执行,导致node节点没有docker镜像
欢迎小伙伴就部署中碰到的问题与我交流