Zeek安装、使用与压力测试
Zeek安装与压力测试
- Zeek安装、简单使用与压力测试
- 环境
- Zeek安装
- zeek简单运行
- 安装PF_RING
- 修改Zeek配置文件,使用PF_RING,实现集群
- 流量压力测试
- 查看zeek日志
Zeek安装、简单使用与压力测试
科研需要,涉及到Zeek的安装、使用和重放流量压力测试评估Zeek性能,没有找到一个较完整的流程,以免后续忘记还是记下来吧
环境
ubuntu18.04
Zeek安装
Zeek官方文档地址:https://zeek-docs-cn.readthedocs.io/zh_CN/chinese/install/install.html
我参考的安装博文:https://qgrain.github.io/2020/03/12/Zeek%E5%AE%89%E8%A3%85/
1.安装所需要的依赖项
sudo apt-get install cmake make gcc g++ flex bison libpcap-dev libssl-dev python-dev swig zlib1g-dev
2.通过源码安装zeek
(1)在官网下载源码,官网下载地址:https://zeek.org/get-zeek/。通过git下载也可以,但是我在下载的时候总是下载不下来,所以直接从官网下载的
(2)解压缩下载的文件后,进入文件夹内,执行以下命令
# ./configure --help
./configure
make
make install
# 默认安装路径为/usr/local/zeek
如果没安装上看看是否没有root权限,可以在前面加上sudo试试,如果缺少什么依赖项,就按照提示按照相应的依赖项
(3)配置运行时环境
export PATH=/usr/local/zeek/bin:$PATH
zeek简单运行
(1)进入zeek/bin文件夹内
cd /usr/local/zeek/bin
(2)运行zeekctl
sudo python3 zeekctl
(3)首次运行需要先在zeekctl交互窗口中输入deploy命令
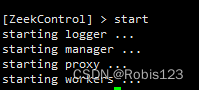
(4)在zeekctl中输入start开启
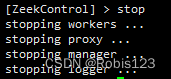
(5)输入stop停止监测
(6)可以输入help了解其他命令使用方法
安装PF_RING
当要使用zeek集群时,需要安装PF_RING,集群的具体原理和作用以及PF_RING都可参考Zeek的官方文档:https://zeek-docs-cn.readthedocs.io/zh_CN/chinese/configuration/index.html?highlight=PF_RING#installing-pf-ring
(1)去ntop的github上下载PF_RING:https://github.com/ntop
(2)解压缩PF_RING后进行安装
cd PF_RING-5.6.2/userland/lib
sudo ./configure --prefix=/opt/pfring
sudo make install
(3)安装一些依赖
下载libcap、tcpdump包后的安装命令如下图
cd ../libpcap
./configure --prefix=/opt/pfring
make installcd ../tcpdump-4.1.1
./configure --prefix=/opt/pfring
make installcd ../../kernel
make
make install
(4)设置PF_RING模式
具体的设置可以参考ntop下PF_RING的官方文档,enable_tx_capture=0应该是不提取发送的数据包
modprobe pf_ring enable_tx_capture=0 min_num_slots=32768
(5)Zeek正确连接到PF_RING libpcap库
注意,在这之前我重新执行了zeek的安装命令,如下命令所示,我不知道是否必须要执行,大家可以自行尝试
./configure --with-pcap=/opt/pfring
make
make install
随后,执行下列命令,确保Zeek正确连接到PF_RING libpcap库
ldd /usr/local/zeek/bin/zeek | grep pcaplibpcap.so.1 => /opt/pfring/lib/libpcap.so.1 (0x00007fa6d7d24000)
修改Zeek配置文件,使用PF_RING,实现集群
我设置了15个worker,每个worker分配了2个逻辑cpu,配置文件如下
注:要按情况设置worker,查清楚cpu内核数,不同worker使用不同的逻辑cpu,同时还需要给logger等其他节点预留cpu
# Example ZeekControl node configuration.
#
# This example has a standalone node ready to go except for possibly changing
# the sniffing interface.# This is a complete standalone configuration.  Most likely you will
# only need to change the interface.
#[zeek]
#type=standalone
#host=localhost
#interface=eno1## Below is an example clustered configuration. If you use this,
## remove the [zeek] node above.[logger-1]
type=logger
host=localhost  #可以改成你的logger所在电脑的IP[manager]
type=manager
host=localhost  #可以改成你的manager所在电脑的IP[proxy-1]
type=proxy
host=localhost  #可以改成你的proxy所在电脑的IP[worker-1]
type=worker
host=localhost  #可以改成你的worker所在电脑的IP
interface=eno1  #改成你的网卡信息
lb_method=pf_ring #使用pf_ring
lb_procs=2 #分配2个逻辑cpu
pin_cpus=0,1 #分配的两个cpu编号[worker-2]
type=worker
host=localhost
interface=eno1
lb_method=pf_ring
lb_procs=2
pin_cpus=2,3[worker-3]
type=worker
host=localhost
interface=eno1
lb_method=pf_ring
lb_procs=2
pin_cpus=4,5[worker-4]
type=worker
host=localhost
interface=eno1
lb_method=pf_ring
lb_procs=2
pin_cpus=6,7[worker-5]
type=worker
host=localhost
interface=eno1
lb_method=pf_ring
lb_procs=2
pin_cpus=8,9[worker-6]
type=worker
host=localhost
interface=eno1
lb_method=pf_ring
lb_procs=2
pin_cpus=10,11[worker-7]
type=worker
host=localhost
interface=eno1
lb_method=pf_ring
lb_procs=2
pin_cpus=12,13[worker-8]
type=worker
host=localhost
interface=eno1
lb_method=pf_ring
lb_procs=2
pin_cpus=14,15[worker-9]
type=worker
host=localhost
interface=eno1
lb_method=pf_ring
lb_procs=2
pin_cpus=16,17[worker-10]
type=worker
host=localhost
interface=eno1
lb_method=pf_ring
lb_procs=2
pin_cpus=18,19[worker-11]
type=worker
host=localhost
interface=eno1
lb_method=pf_ring
lb_procs=2
pin_cpus=20,21[worker-12]
type=worker
host=localhost
interface=eno1
lb_method=pf_ring
lb_procs=2
pin_cpus=22,23[worker-13]
type=worker
host=localhost
interface=eno1
lb_method=pf_ring
lb_procs=2
pin_cpus=24,25[worker-14]
type=worker
host=localhost
interface=eno1
lb_method=pf_ring
lb_procs=2
pin_cpus=26,27[worker-15]
type=worker
host=localhost
interface=eno1
lb_method=pf_ring
lb_procs=2
pin_cpus=28,29
流量压力测试
(1)安装tcpreplay
sudo apt-get install tcpreplay
(2)修改数据包
tcprewrite --infile=test.pcap --outfile=test_1.pcap --dstipmap=0.0.0.0/0:111.111.11.111 --enet-dmac=ab:cd:ef:ef:ab:cd
(3)更新数据包校验和
tcprewrite --infile=test_1.pcap --outfile=test_final.pcap --fixcsum
(4)重放数据包
tcpreplay -v -i eth0 -M 1000 test_final.pcap
查看zeek日志
Zeek日志保存在zeek文件夹的log子文件夹内,即/usr/local/zeek/log,通过查看日志可以查看Zeek流量监控结果
上一篇:各种各样的锁