JAVA进阶(IO流) —— 高级流
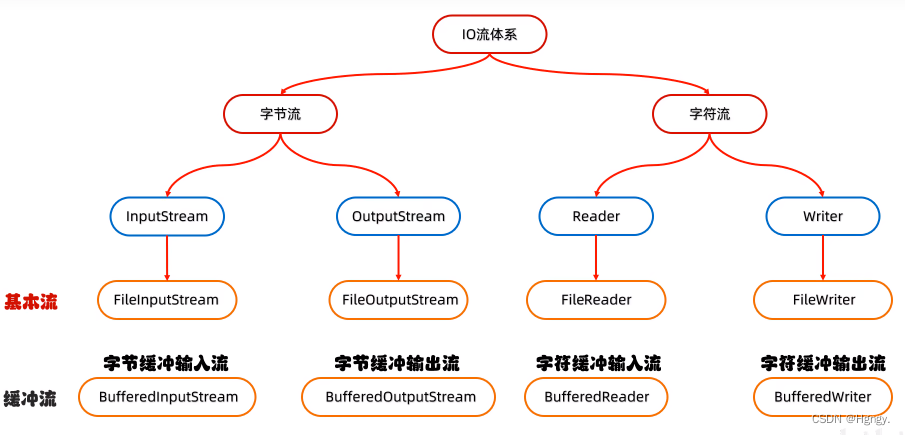
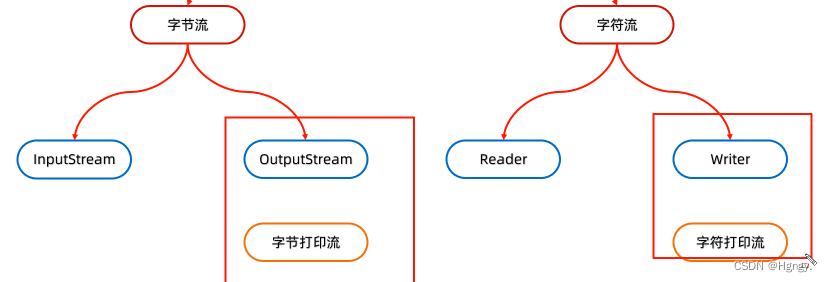
通过之前我们对于 JAVA进阶(IO流) —— 基本流 中字节流与字符流的学习,但是基本流中的四大流均是抽象类,不可以实例化,在实际开发中使用的都是其子类。
而这篇文章所要学习得高级流其实就是在基本流的基础上添加缓冲流,是对基本流进行包装。
目录
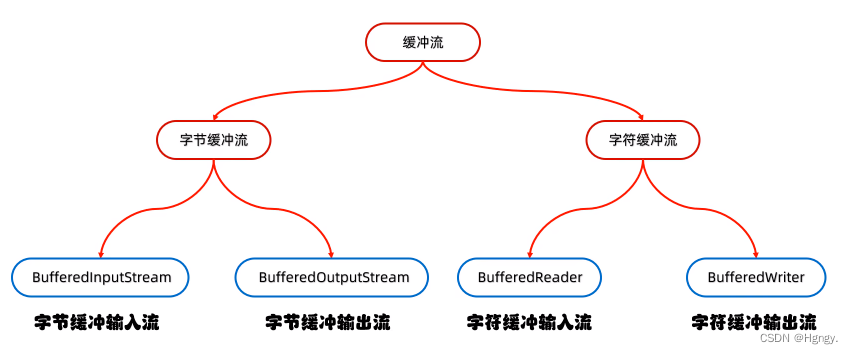
一、缓冲流
1. 字节缓冲流
2. 字符缓冲流
2.1 字符缓冲流特有的方法
3. 综合练习:四种方式拷贝文件
二、转换流
练习1: 利用转换流按照指定字符编码读取
练习2:利用转换流按照指定字符编码写出
练习3:将本地文件的GBK文件转换成UTF-8
三、 序列化流
1. 序列化流 / 对象操作输出流
2. 反序列化 / 对象操作输入流
3. 序列化流 / 反序列化流的细节汇总
4. 练习:用对象流读写多个对象
四、打印流
1. 字节打印流
2. 字符打印流
3. 打印流的应用场景
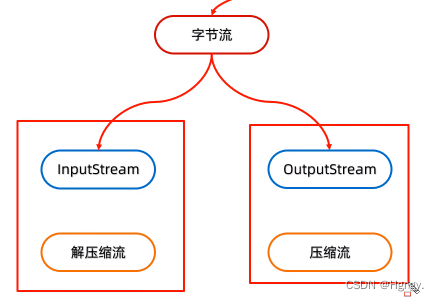
五、解压缩流 / 压缩流
1. 解压缩流
2. 压缩流
2.1 压缩单个文件
2.2 压缩文件夹
一、缓冲流
1. 字节缓冲流
原理:底层自带了长度为 8192 的缓冲区提高性能。
| 方法名称 | 说明 |
| public BufferedInputStream(InpueStream is) | 把基本流包装成高级流,提高读取数据的性能 |
| public BufferedOutputStream(OutputStream os) | 把基本流包装成高级流,提高写出数据的性能 |
通过练习加以认知:拷贝文件
需求:利用字节缓冲流拷贝文件
public class BufferedStreamDemo1 {public static void main(String[] args) throws IOException {// 1.创建缓冲流对象// 底层自动默认创建长度为8192的字节数组BufferedInputStream bis = new BufferedInputStream(new FileInputStream("java02\\a.txt"));BufferedOutputStream bos = new BufferedOutputStream(new FileOutputStream("java02\\copy.txt"));// 2.循环读取并写入目的地// 一次拷贝一个字节int b;while ((b = bis.read()) != -1) {bos.write(b);}// 一次拷贝多个字节(字节数组)byte[] bytes = new byte[1024];int len;while ((len - bis.read()) != -1) {bos.write(bytes, 0, len);}// 3.释放资源// 底层自动关闭基本流// 不需要再手动关闭基本流bos.close();bis.close();}
}
字符缓冲流提高效率的读写原理:
- 缓冲流自带长度为8192的缓冲区。
- 可以明显提高字节流的读写性能。
- 对于字符流提升不明显,对于字符缓冲流而言关键点是两个特有的方法。

2. 字符缓冲流
原理:底层自带了长度为 8192 的缓冲区提高性能。
| 成员方法 | 说明 |
| public BufferedReader ( Reader r ) | 把基本流变成高级流 |
| public Bufferedwriter ( Writer r ) | 把基本流变成高级流 |
2.1 字符缓冲流特有的方法
| 字符缓冲输入流特有方法 | 说明 |
| public String readLine ( ) | 读取一行数据,如果没有数据可读了,会返回null |
public class BufferedStreamDemo3 {public static void main(String[] args) throws IOException {// 1.创建字符缓冲输入流对象BufferedReader br = new BufferedReader(new FileReader("java02\\a.txt"));// 2.读取数据// 细节:readLine方法在读取的时候,一次会读一整行// 遇到回车换行结束 但是不会把回车换行读到内存当中String line = br.readLine();System.out.println(line);// 循环String line;while ((line = br.readLine()) != null) {System.out.println(line);}// 3.释放资源br.close();}
}| 字符缓冲输出流特有方法 | 说明 |
| public void newLine ( ) | 跨平台的换行 |
public class BufferedStreamDemo4 {public static void main(String[] args) throws IOException {// 1.创建字符缓冲输出流对象// 开启续写BufferedWriter bw = new BufferedWriter(new FileWriter("b.txt", true));// 2.写出数据bw.write("好好学习!");bw.newLine();bw.write("天天向上!");bw.newLine();// 3.释放资源bw.close();}
}
3. 综合练习:四种方式拷贝文件
需求:四种方式拷贝文件,并统计各自用时。
- 字节流的基本流:一次读写一个字节
- 字节流的基本流:一次读写一个字节数组
- 字节缓冲流:一次读写一个字节
- 字节缓冲流:一次读写一个字节数组
public class Test {public static void main(String[] args) throws IOException {long start = System.currentTimeMillis();method1();method2(); // 16.253smethod3(); // 95.456smethod4(); // 18.488slong end = System.currentTimeMillis();System.out.println((end - start) / 1000.0 + "s");}// 1. 字节流的基本流:一次读写一个字节public static void method1() throws IOException {FileInputStream fis = new FileInputStream("java02\\a.txt");FileOutputStream fos = new FileOutputStream("java02\\b.txt");int b;while ((b = fis.read()) != -1) {fos.write(b);}fos.close();fis.close();}// 2. 字节流的基本流:一次读写一个字节数组public static void method2() throws IOException {FileInputStream fis = new FileInputStream("java02\\a.txt");FileOutputStream fos = new FileOutputStream("java02\\b.txt");int len;byte[] bytes = new byte[8192];while ((len = fis.read()) != -1) {fos.write(bytes, 0, len);}fos.close();fis.close();}// 3.字节缓冲流:一次读写一个字节public static void method3() throws IOException {BufferedInputStream bis = new BufferedInputStream(new FileInputStream("java02\\a.txt"));BufferedOutputStream bos = new BufferedOutputStream(new FileOutputStream("java02\\b.txt"));int b;while ((b = bis.read()) != -1) {bos.write(b);}bos.close();bis.close();}// 4.字节缓冲流:一次读写一个字节数组public static void method4() throws IOException {BufferedInputStream bis = new BufferedInputStream(new FileInputStream("java02\\a.txt"));BufferedOutputStream bos = new BufferedOutputStream(new FileOutputStream("java02\\b.txt"));int len;byte[] bytes = new byte[8192];while ((len = bis.read()) != -1) {bos.write(bytes, 0, len);}bos.close();bis.close();}
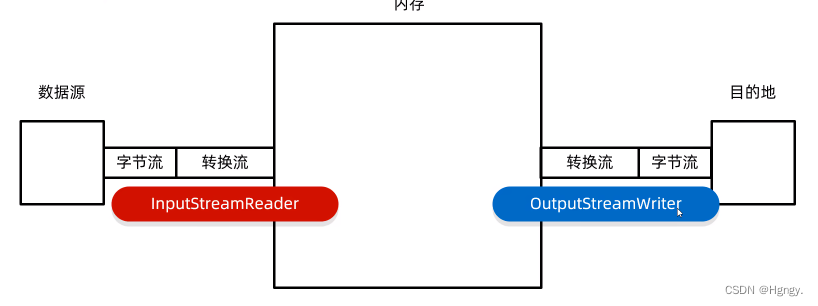
}二、转换流
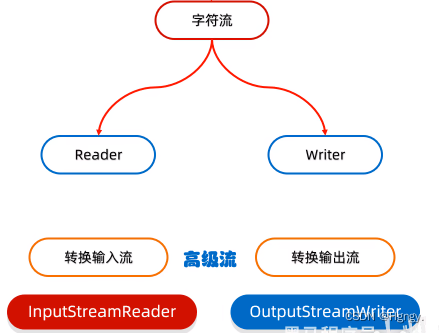
转换流:是字符流和字节流之间的桥梁。(转换流本身就是字符流)
练习1: 利用转换流按照指定字符编码读取
public class ConverStreamDemo1 {public static void main(String[] args) throws IOException {// 1.创建对象并指定字符编码(了解)// JDK11:这种方式被淘汰// InputStreamReader:默认编码 UTF-8-> 指定编码 GBK// InputStreamReader isr = new InputStreamReader(new// FileInputStream("java02\\a.txt"),"GBK");//// 2.读取数据// int ch;// while((ch = isr.read()) != -1) {// System.out.print((char)ch);// }// 3.释放资源// isr.close();FileReader fr = new FileReader("java02\\a.txt", Charset.forName("GBK"));// 2.读取数据int ch;while ((ch = fr.read()) != -1) {System.out.print((char) ch);}// 3.释放资源fr.close();}
}
练习2:利用转换流按照指定字符编码写出
public class ConverStreamDemo2 {public static void main(String[] args) throws IOException {// 1.创建转换流对象// OutputStreamWriter osw = new OutputStreamWriter(new// FileOutputStream("java02\\b.txt"), "GBK");// 2.写出数据// osw.write("你好你好!");// 3.释放资源// osw.close();FileWriter fw = new FileWriter("java02\\b.txt", Charset.forName("GBK"));fw.write("你好你好!");fw.close();}
}
练习3:将本地文件的GBK文件转换成UTF-8
public class ConverStreamDemo3 {public static void main(String[] args) throws IOException {// 1.JDK11以前版本// InputStreamReader isr = new InputStreamReader(new// FileInputStream("java02\\a.txt"),"GBK");// OutputStreamWriter osw = new OutputStreamWriter(new// FileOutputStream("java02\\b.txt"),"UTF-8");//// int b;// while((b = isr.read())!= -1) {// osw.write(b);// }// osw.close();// isr.close();// 2.替换方案FileReader fr = new FileReader("java02\\a.txt", Charset.forName("GBK"));FileWriter fw = new FileWriter("java02\\b.txt", Charset.forName("UTF-8"));int b;while ((b = fr.read()) != -1) {fw.write(b);}fw.close();fr.close();}
}
三、 序列化流
1. 序列化流 / 对象操作输出流
- 可以把Java中的对象写到本地文件中。
注意:使用对象输出流将对象保存到文件时会出现 NotSerializableException 异常。
解决方案: 需要让javaBean类诗选 Serializable 接口。
| 构造方法 | 说明 |
| public objectOutputStream ( Outputstream out ) | 把基本流包装成高级流 |
| 成员方法 | 说明 |
| public final void writeObject ( Object obj ) | 把对象序列化(写出)到文件中去 |
public class ObjectStreamDemo1 {public static void main(String[] args) throws IOException {// 通过序列化把一个对象写到本地文件中// 1.创建对象Student stu = new Student("zhangsan", 23);// 2.创建序列化流的对象/序列化输出流ObjectOutputStream oos = new ObjectOutputStream(new FileOutputStream("java02\\a.txt"));// 3.写入数据oos.writeObject(stu);// 4.释放资源oos.close();}
}//Student.javapublic class Student implements Serializable{//Serializable接口里面没有抽象方法 标记性接口//一旦实现了这个接口 那么就表示当前的Student类可以序列化private String name;private int age;public Student() {}public Student(String str) {String[] arr = str.split(",");this. name = arr[0];this.age = Integer.parseInt(arr[1]);}public Student(String name,int age) {this.name = name;this.age = age;}public String getName() {return name;}public void setName(String name) {this.name = name;}public int getAge() {return age;}public void setAge(int age) {this.age = age;}@Overridepublic String toString() {return "Student [name=" + name + ", age=" + age + "]";}
}
2. 反序列化 / 对象操作输入流
- 可以把序列化到本地文件中的对象,读取到程序当中。
| 构造方法 | 说明 |
| public objectInputStream ( Inputstream out ) | 把基本流包变成高级流 |
| 成员方法 | 说明 |
| public Object readObject ( ) | 把序列化到本地文件中的对象,读取到程序中来 |
public class ObjectStreamDemo2 {public static void main(String[] args) throws IOException {// 1.创建反序列化对象ObjectInputStream ois = new ObjectInputStream(new FileInputStream("java02\\a.txt"));// 2.读取数据Object o = ois.readObject();// 3.打印对象System.out.println(o);// 4.释放资源ois.close();}
}
3. 序列化流 / 反序列化流的细节汇总
① 使用序列化流将对象写到文件时,需要让Javabean类实现 Serializable接口。
否则,会出现 NotSerializableException 异常。
② 序列化流写到文件中的数据是不能修改的,一旦修改就无法再次读回来。
③ 序列化对象后,修改了Javabean 类,再次反序列化,会不会有问题 ?
- 会出现问题 , 会抛出 InvalidClassException 异常。
- 解决方案:给Javabean类添加serialVersionUID (序列化、版本号)
④ 如果一个对象中的某个成员变量的值不想被序列化,又该如何实现呢?
- 解决方案:给该成员变量加transient关键字修饰,该关键字标记的成员变量不参与序列化过程。
4. 练习:用对象流读写多个对象
需求:将多个自定义对象序列化到文件中,但是由于对象的个数不确定,反序列化流该如何读取呢?
public class Test {public static void main(String[] args) throws IOException, ClassNotFoundException {// 1.序列化多个对象Student s1 = new Student("zhangsan", 23, "北京");Student s2 = new Student("lisi", 24, "南京");Student s3 = new Student("wangwu", 25, "上海");// 创建序列化流对象ObjectOutputStream oos = new ObjectOutputStream(new FileOutputStream("java02\\a.txt"));oos.writeObject(s1);oos.writeObject(s2);oos.writeObject(s3);oos.close();// 2.创建反序列化流对象ObjectInputStream ois = new ObjectInputStream(new FileInputStream("java02\\a.txt"));// 读取数据(三个数据读取三次)Student s4 = (Student) ois.readObject();Student s5 = (Student) ois.readObject();Student s6 = (Student) ois.readObject();// Student s7 = (Student)ois.readObject(); //EOFException// 将多个对象放入集合当中ArrayList list = (ArrayList) ois.readObject();// 不再序列化Student对象 直接序列化集合for (Student s : list) {System.out.println(s);}// System.out.println(s4);// System.out.println(s5);// System.out.println(s6);ois.close();}
}
四、打印流
- 打印流只能读不能写。
分类:打印流一般是指:PrintStream、PrintWriter 两个类。
- 特点1:打印流只操作文件目的地,不操作数据源。
- 特点2:特有的写出方法可以实现,数据原样写出。
- 特点3:特有的写出方法,可以实现自动刷新,自动换行。(打印一次数据 = 写出 + 换行 + 刷新)
1. 字节打印流
| 构造方法 | 说明 |
| public PrintStream ( Outputstream / File / String ) | 关联字节输出流 / 文件 / 文件路径 |
| public Printstream ( String fileName ,Charset charset ) | 指定字符编码 |
| public PrintStream ( Outputstream out , boolean autoFXush ) | 自动刷新 |
| public Printstream( Outputstream out,boolean autoFlush ,String encoding) | 指定字符编码且自动刷新 |
注意:字节流底层没有缓冲区,开不开自动刷新是一样的。
| 成员方法 | 说明 |
| public void write ( int b ) | 常规方法:规则跟之前一样,将指定的字节写出 |
| public void println ( Xxx xx ) | 特有方法:打印任意数据,自动刷新,自动换行 |
| public void print ( Xxx xx ) | 特有方法:打印任意数据,不换行 |
| public void printf ( String format ,Object... args ) | 特有方法:带有占位符的打印语句,不换行 |
public class PrintStreamDemo1 {public static void main(String[] args) throws UnsupportedEncodingException, FileNotFoundException {// 1.创建字节打印流对象PrintStream ps = new PrintStream(new FileOutputStream("java02\\a.txt"), true, "UTF-8");// 2.调用方法ps.println(97); // 写出 + 自动刷新 + 自动换行ps.print(true);ps.printf("%s 爱上了 %s", "阿珍", "阿强");// 3.释放资源ps.close();}
}
2. 字符打印流
| 构造方法 | 说明 |
| public Printwriter ( Write / File / String ) | 关联字节输出流 / 文件 / 文件路径 |
| public Printwriter ( String fileName , Charset charset ) | 指定字符编码 |
| public Printwriter ( Write w , boolean autoFlush ) | 自动刷新 |
| public Printwriter ( Outputstream out,boolean autoFlush,Charset charset ) | 指定字符编码且自动刷新 |
注意:字符流底层有缓冲区,想要自动刷新需要开启。
| 成员方法 | 说明 |
| public void write ( int b ) | 常规方法:规则跟之前一样,写出字节或者字符串 |
| public void println ( Xxx xx ) | 特有方法:打印任意类型的数据并且换行 |
| public void print ( Xxx xx ) | 特有方法:打印任意类型的数据,不换行 |
| public void printf ( String format ,Object... args ) | 特有方法:带有占位符的打印语句 |
public class PrintStreamDemo2 {public static void main(String[] args) throws IOException {// 1.创建字符打印流对象PrintWriter pw = new PrintWriter(new FileWriter("java02\\a.txt"),true);// 2.写出数据pw.println("你好!");pw.print("你好你好");pw.printf("%s 爱上了 %s", "阿珍", "阿强");// 3.释放资源pw.close();}
}
3. 打印流的应用场景
public class PrintStreamDemo3 {public static void main(String[] args) throws UnsupportedEncodingException, FileNotFoundException {// 获取打印流的时候,此打印流在虚拟机启动的时候,由虚拟机创建,默认指向控制台// 特殊的打印流:系统中的标准输出流,是不能关闭,在系统中是唯一的。PrintStream ps = System.out;// 调用打印流中的方法println// 写出数据:自动换行,自动刷新ps.println("123");// 以上等同于// System.out.println();ps.close();}
}
五、解压缩流 / 压缩流
1. 解压缩流
解压本质:把每一个ZipEntry按照层级拷贝到本地另一个文件中。
public class ZipStreamDemo1 {public static void main(String[] args) throws IOException {// 1.创建一个 File 表示要解压的压缩包File src = new File("D:\\a.zip");// 2.创建一个 File 表示解压的目的地File dest = new File("D:\\");// 调用方法unzip(src, dest);}// 定义一个方法用来解压public static void unzip(File src, File dest) throws IOException {// 解压本质 : 把压缩包中的每一个文件或者文件夹拷贝到目的地中ZipInputStream zip = new ZipInputStream(new FileInputStream(src));// 要先获取到压缩包内的每一个zipEntry对象// 表示当前在压缩包中获取到的文件或者文件夹ZipEntry entry;while ((entry = zip.getNextEntry()) != null) {System.out.println(entry);if (entry.isDirectory()) {// 文件夹: 需要再目的地dest处创建一个同样的文件夹File file = new File(dest, entry.toString());file.mkdirs();} else {// 文件: 需要读取到压缩包中的文件,并把其放到目的地dest文件夹中FileOutputStream fos = new FileOutputStream(new File(dest, entry.toString()));int b;while ((b = zip.read()) != -1) {// 写到目的地fos.write(b);}fos.close();// 表示压缩包中的一个文件处理完毕zip.closeEntry();}}zip.close();}
}
2. 压缩流
- 负责压缩文件或者文件夹。
2.1 压缩单个文件
public class ZipStreamDemo2 {public static void main(String[] args) throws IOException {// 1.创建一个file对象表示要压缩的文件File src = new File("D:\\a.txt");// 2.创建file对象表示压缩包的位置File dest = new File("D:\\");// 3.调用方法toZip(src, dest);}public static void toZip(File src, File dest) throws IOException {// 1.创建压缩流关联压缩包ZipOutputStream zos = new ZipOutputStream(new FileOutputStream(new File(dest, "a.zip")));// 2.创建ZipEntry对象,表示压缩包里面的每一个文件和文件夹ZipEntry entry = new ZipEntry("a.txt");// 3.把ZipEntry对象放到压缩包中zos.putNextEntry(entry);// 4.把src文件中的数据写到压缩包当中FileInputStream fis = new FileInputStream(src);int b;while ((b = fis.read()) != -1) {zos.write(b);}zos.closeEntry();zos.close();}
}
2.2 压缩文件夹
public class ZipStreamDemo3 {public static void main(String[] args) throws IOException {// 1.创建File对象表示要压缩的文件夹File src = new File("D:\\aaa");// src改变 dest同样需要改变 所以我可以直接获取父级路径// File dest = new File("D:\\a.zip");// 2. 创建File对象表示压缩包的父级路径File destParent = src.getParentFile();// 3. 创建File对象表示压缩包的路径File dest = new File(destParent, src.getName() + ".zip");System.out.println(dest); // D:\aaa.zip// 4.创建压缩流关联压缩包ZipOutputStream zos = new ZipOutputStream(new FileOutputStream(dest));// 5.获取src中每一个文件,变成zipEntry对象,放到压缩包中toZip(src, zos, src.getName()); // getName: aaa// 6.释放资源zos.close();}// 参数一:数据源// 参数二:压缩流// 参数三:压缩包内部路径public static void toZip(File src, ZipOutputStream zos, String name) throws IOException {// 1.进入src文件夹File[] files = src.listFiles();// 2.遍历数组for (File file : files) {if (file.isFile()) {// 文件:变成ziEntry对象,放到压缩包当中// ZipEntry entry = new ZipEntry(file.toString()); //D:\\aaa\\a.txt 而我们不要D:\\ZipEntry entry = new ZipEntry(name + "\\" + file.getName()); // aaa\\a.txtzos.putNextEntry(entry);// 读取文件中的数据,写到压缩包中FileInputStream fis = new FileInputStream(file);int b;while ((b = fis.read()) != -1) {zos.write(b);}fis.close();zos.closeEntry();} else {// 文件夹:递归toZip(file, zos, name + "\\" + file.getName());}}}
}