MyBatis框架的基础用法
文章目录
- 前言
- 一、MyBatis是什么?
- 二、创建MyBatis项目
- 1.添加依赖
- 2.配置数据库信息
- 3.配置mybatis中的xml路径
- 三、增删查改
- 1.查询操作
- 根据id查询用户。
- 查询所有用户
- 2.添加操作
- 添加用户
- 添加并返回用户的自增id
- 3.修改操作
- 4.删除操作
- @Transactional
- 四、注意事项和常见操作
- 1.#和¥的差别
- 2.SQI注入问题
- 3.resultMap用法
- 4.模糊查询
- 5.多表联查
- 6.动态SQL
- (1)
标签 - (2)
标签 - (3)
标签 - (4)
、 标签 - (6)
- (1)
前言
前面学习了Spring、Spring Boot、Spring MVC一些优秀的后端程序开发框架,但是对于完整的后端开发来说,数据库是必不可少的,而今天学习的MyBatis是一款优秀的持久层框架,是更简单完成程序和数据库交互的工具,也是更简单的操作和读取数据库工具。
一、MyBatis是什么?
MyBatis是一款持久层框架,它支持自定义SQL、存储过程以及高级映射。可以通过简单的XML或注解来配置和映射原始类型、接口等。
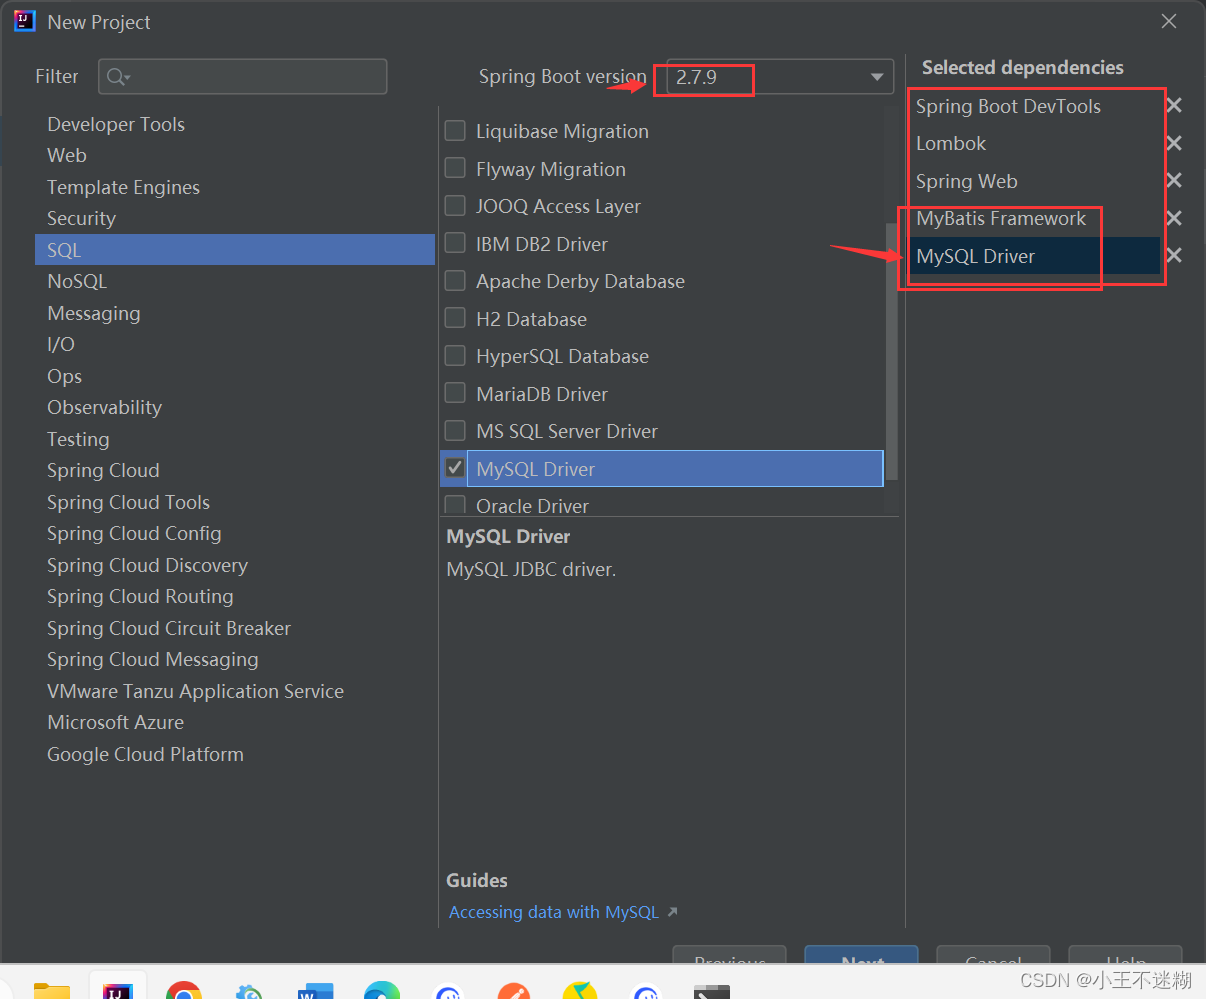
二、创建MyBatis项目
1.添加依赖
新项目或者旧项目都需要添加如下依赖:
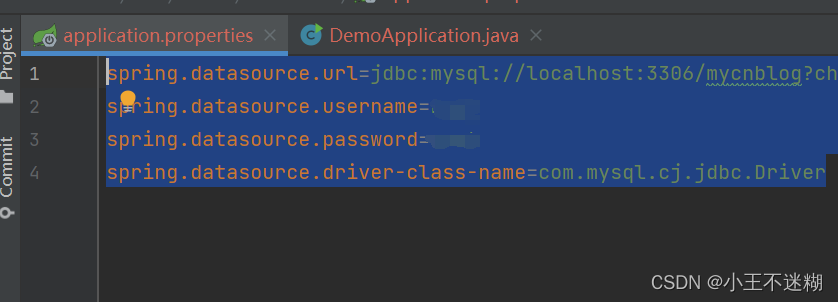
2.配置数据库信息
必须要连上数据库,程序才能运行起来,不报错。
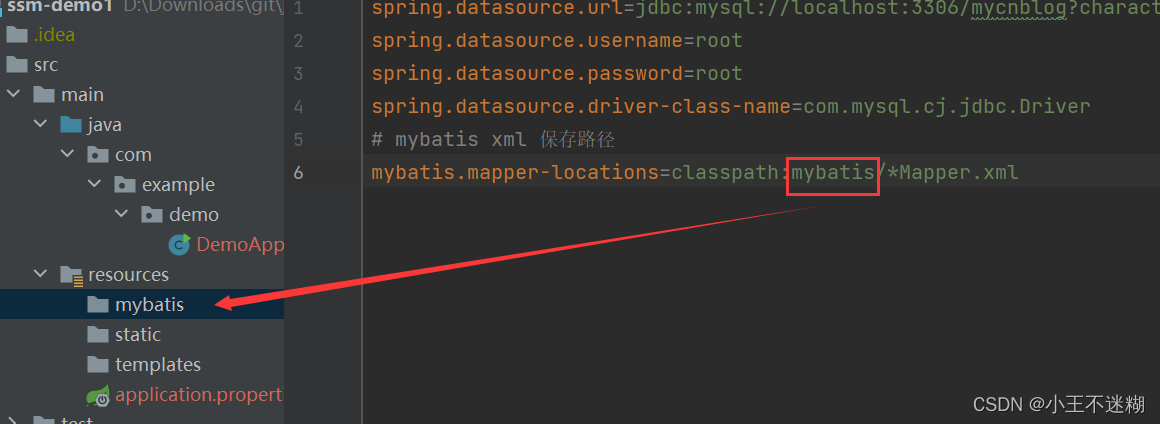
3.配置mybatis中的xml路径
三、增删查改
1.查询操作
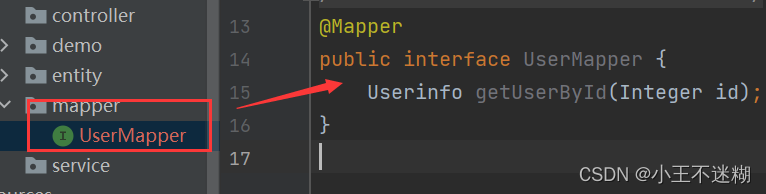
根据id查询用户。
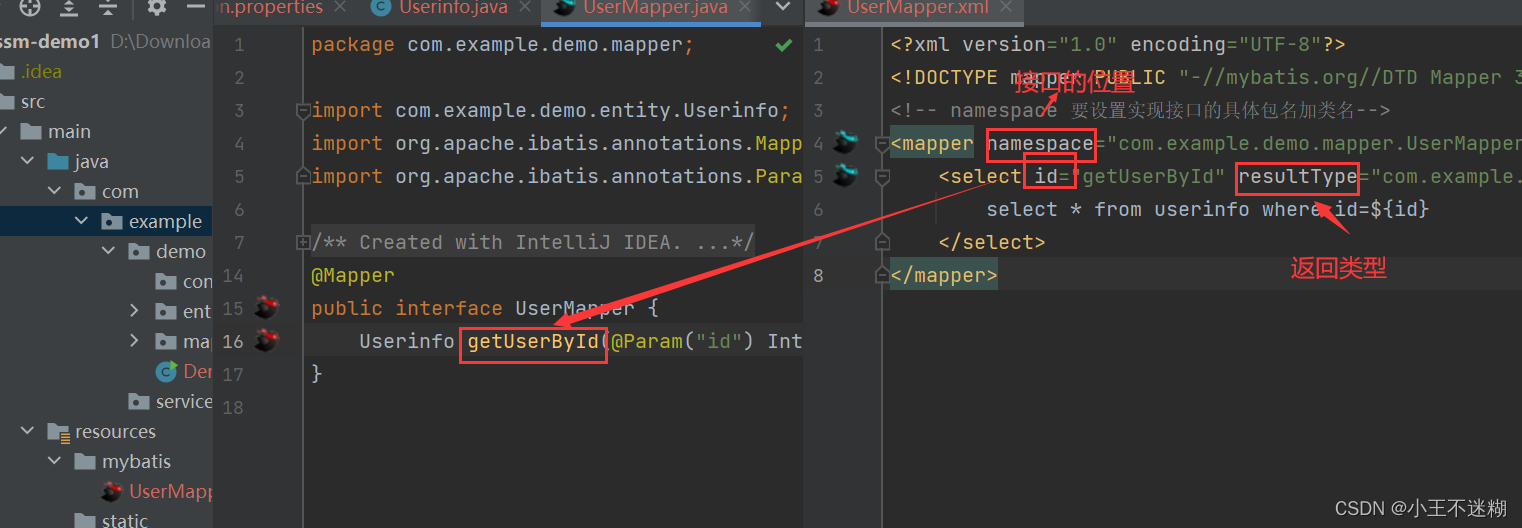
(1)创建实体类。

(2)构建Mapper层的代码实现(接口+XML)
a.创建接口;
b.创建XML实现。
(3)实现服务层
@Service
public class UserService {@Autowiredprivate UserMapper userMapper;public Userinfo getUserById(Integer id) {return userMapper.getUserById(id);}
}
(4)实现控制器
@RestController
@RequestMapping("/user")
public class UserController {@Autowiredprivate UserService userService;@RequestMapping("/get-user-id")public Userinfo getUserById(Integer id) {if (id == null) return null;return userService.getUserById(id);}
}

进行单元测试:
在mapper中直接快捷键(Alt+Insert)生成单元测试。
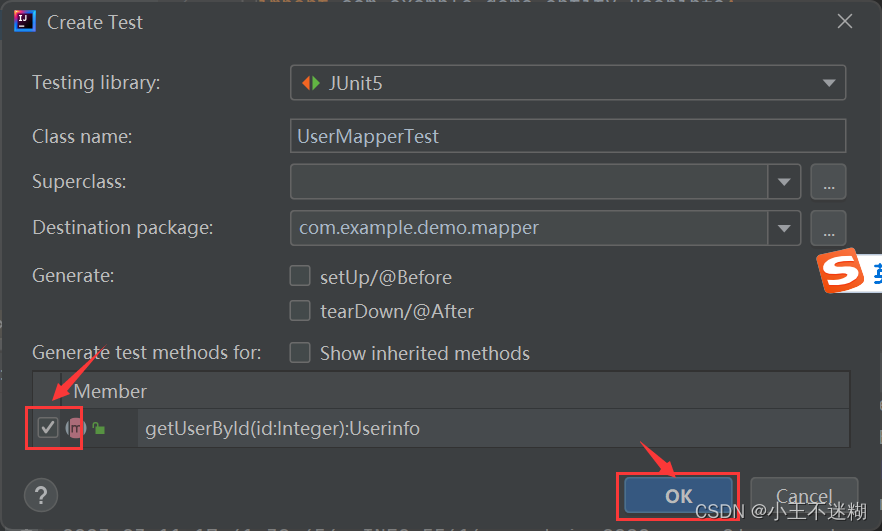
单元测试代码:
@Autowiredprivate UserMapper userMapper;@Testvoid getUserById() {Userinfo userinfo = userMapper.getUserById(1);System.out.println(userinfo);}
查询所有用户
(1)xml中的配置。
(2)测试。
//查询所有用户信息@Testvoid getAll() {List list = userMapper.getAll();Assertions.assertEquals(3,list.size());}
2.添加操作
添加用户
(1)在接口中声明方法。
//添加操作int add(Userinfo userinfo);
(2)在xxx.xml中提供实现。
insert into userinfo(username,password,createtime,updatetime)values(#{username},#{password},#{createtime},#{updatetime})
(3)检测(单元测试)。
@Testvoid add() {//伪代码,构建一个对象Userinfo userinfo = new Userinfo();userinfo.setUsername("张三");userinfo.setPassword("123");userinfo.setCreatetime(LocalDateTime.now());userinfo.setUpdatetime(LocalDateTime.now());//执行添加操作int result = userMapper.add(userinfo);System.out.println(result);Assertions.assertEquals(1,result);}
添加并返回用户的自增id
useGeneratedKey,keyProperty:程序中实体类的属性,而非数据库的字段。
关键是xml中的实现。
insert into userinfo(username,password,createtime,updatetime)values(#{username},#{password},#{createtime},#{updatetime})
3.修改操作
(1)修改接口。
//修改用户int upUserName(Userinfo userinfo);
(2)xml配置。
update userinfo set username=#{username} where id=#{id}
(3)测试。
在 @Testvoid upUserName() {Userinfo userinfo = new Userinfo();userinfo.setId(5);userinfo.setUsername("陈尔尔");int result = userMapper.upUserName(userinfo);System.out.println(result);}
4.删除操作
(1)接口。
//删除根据Idint delById(@Param("id") Integer id);
(2)xml配置。
delete from userinfo where id=#{id}
(3)测试。
@Testvoid delById() {Integer id = 6;int result = userMapper.delById(id);System.out.println(result);}
@Transactional
测试但是不对数据库中的值做出真的修改。
四、注意事项和常见操作
1.#和¥的差别
#{}:预编译处理。
¥{}:字符直接替换。
直接替换,可能会带来越权查询和操作数据库。但有一些方面是需要的,使用¥{sort}实现排序,模糊查询等一些需要直接注入的情景。
区别:
(1)¥存在SQL注入的问题,而#不存在;
(2)¥直接替换,#是预处理。
2.SQI注入问题
SQL注入可以利用修改SQL语句查询到数据库信息,例如where 后的条件(1=1)只要是true就可以查询到数据库信息。
3.resultMap用法
使用场景:实现程序中属性和表中字段映射的功能(当程序中的属性和表中的字段不一致时,可以强行映射到一起)。
当程序中的属性和数据库中的字段名不一致时的解决方案:
(1)使用resultMap标签(在mapper.xml中定义);
(2)使用数据库别名as重命名。
4.模糊查询
最主要的是配置xml。
其中SQL的写法有两种方式。
5.多表联查
(1)一对一
id为1的用户文章信息和用户名。
(2)一对多。
id为1的用户的所有文章。
最终的一个实现:联表查询语句(left join/inner join)+ XXXVO
6.动态SQL
(1)标签
insert into userinfo(username,photo, password)values(#{username},#{photo}, #{password})
(2)标签
prefix:最前面的固定值;
suffix:最后的固定值;
suffixOverrides:最后要覆盖的值。
insert into userinfousername, password, photo #{username}, #{password}, #{photo}
(3)标签
特征:
1.where标签通常要配合if标签一起使用;
2.where标签会删除最前面的and关键字(注意不会删除最后面);
3.where标签中如果没有内容,那么它也不会生成where sql 关键字。
(4)、标签
update userinfousername=#{username} id=#{id} (6)
collection为设置的集合。(需要删除的数据)
open为开始。
close为结束。
item为集合中的数据。
separator为集合中数据的分隔符。
delete from userinfo where id in#{id}
上一篇:世界技能大赛样题——安全事件响应
下一篇:18--转发API